1. CRA로 프로젝트 생성하기
리액트 프로젝트 설치하고 싶은곳까지 터미널로 이동 후 입력
ls

cd 폴더이름

yarn create react-app 프로젝트 #프로젝트 생성
2. yarn 에서 styled-components 설치하기
yarn add styled-components
3. 리덕스 설치
yarn add redux react-redux

아래와 같은 의미
yarn add redux
yarn add react-redux
리덕스 툴킷 설치
yarn add @reduxjs/toolkit4. 폴더 구조 생성하기
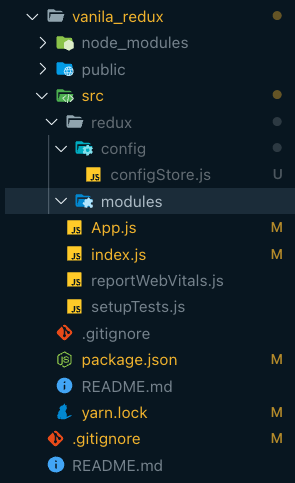
이미지와 같이 폴더 구조를 생성
- src 폴더 안에 redux 폴더를 생성
- redux 폴더 안에 config, modules 폴더를 생성
- config 폴더 안에 configStore.js파일을 생성
각각의 폴더와 파일은 역할이 있습니다.
- redux : 리덕스와 관련된 코드를 모두 모아 놓을 폴더 입니다.
- config : 리덕스 설정과 관련된 파일들을 놓을 폴더 입니다.
- configStore : “중앙 state 관리소" 인 Store를 만드는 설정 코드들이 있는 파일 입니다.
- modules : 우리가 만들 State들의 그룹이라고 생각하면 됩니다. 예를 들어 투두리스트를 만든다고 한다면, 투두리스트에 필요한 state들이 모두 모여있을 todos.js를 생성하게 되텐데요, 이 todos.js 파일이 곧 하나의 모듈이 됩니다.
5. 설정 코드 작성
5-1. src/configStore.js 에 아래 코드를 입력
import { createStore } from "redux";
import { combineReducers } from "redux";

const rootReducer = combineReducers({});
const store = createStore(rootReducer);

export default store;
5-2. 디렉토리의 가장 최상단에 있는 index.js에 아래 내용을 입력
// 원래부터 있던 코드
import React from "react";
import ReactDOM from "react-dom/client";
import App from "./App";
import reportWebVitals from "./reportWebVitals";

// 우리가 추가할 코드
import store from "./redux/config/configStore";
import { Provider } from "react-redux";

const root = ReactDOM.createRoot(document.getElementById("root"));
root.render(

	//App을 Provider로 감싸주고, configStore에서 export default 한 store를 넣어줍니다.
  <Provider store={store}>
    <App />
  </Provider>
);

// If you want to start measuring performance in your app, pass a function
// to log results (for example: reportWebVitals(console.log))
// or send to an analytics endpoint. Learn more: https://bit.ly/CRA-vitals
reportWebVitals();
6. react-router-dom 설치하기
yarn add react-router-dom
7. json 서버 설치
yarn add json-server8. 악시오스 설치
yarn add axios'공부 > 리액트 (React)' 카테고리의 다른 글
| [React] MongoDB로 저장할때 UTC로 저장되는 시간을 KST로 변경하기 (0) | 2022.11.14 |
|---|---|
| [React] 리액트에서 폰트어썸(Font Awesome)사용하기 (0) | 2022.10.31 |
| [React] 상태 관리 도구(State Management Tools)의 필요성 (0) | 2022.10.12 |
| React에서 렌더링이란 무엇일까? +DOM (0) | 2022.10.05 |
| SPA vs MPA (1) | 2022.10.05 |